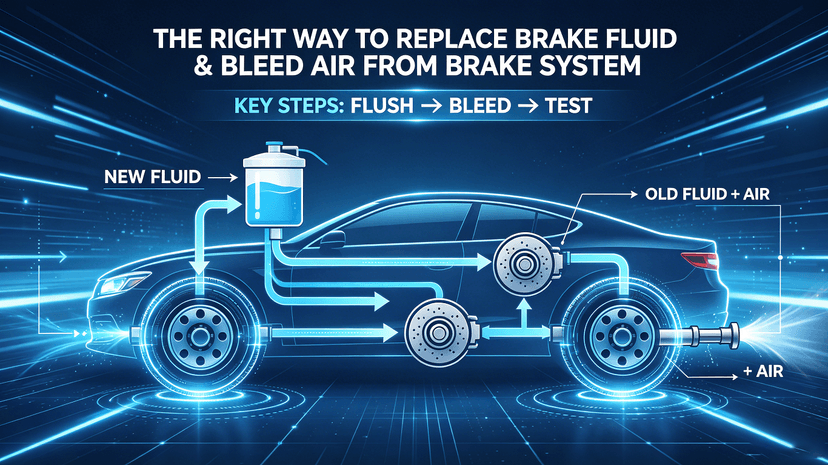
The Right Way To Replace Brake Fluid & Bleed Air From Brake System
Simply draining old brake fluid and pouring new fluid into the reservoir cannot fully protect your braking system—residual old fluid, moisture and trapped air bubbles remain hidden inside calipers and narrow pipelines, continuing to compromise brake performance. Whether you are a professional auto repair technician or an experienced DIY vehicle owner, following this standardized full flushing and air bleeding workflow ensures complete fluid renewal and zero trapped air. This guide covers full step-by-step operations, required tools and typical missteps to avoid.
1. Pre-operation Preparation & Required Tools
Necessary Tools & Consumables
- Matching grade certified brake fluid (DOT3/DOT4/DOT5.1 consistent with vehicle factory specification; never mix different glycol grades or silicone DOT5);
- Brake fluid bleeding wrench set, clear transparent collection drain bottle, plastic drain hose;
- Jack stands, vehicle lifting equipment, disposable gloves, absorbent rags (brake fluid corrodes car paint, wipe spills immediately);
- Torque wrench for caliper bleeder screw tightening.
Pre-work Vehicle Check
- Park vehicle on flat level ground, engage parking brake and lift all four wheels safely with jack stands;
- Confirm brake reservoir liquid level is above the MIN line;
- Clean dirt and dust off all four caliper bleeder screws to prevent impurities entering pipelines during bleeding;
- Seal new brake fluid cans tightly when not in use—glycol fluid absorbs airborne moisture rapidly once opened.
2. Standard Full Brake Fluid Flushing Step-by-step Workflow
Step 1: Extract Old Fluid From The Master Cylinder Reservoir
Use a fluid suction pump to remove all aged fluid from the plastic reservoir. Wipe sediment and sludge deposits off the reservoir inner wall with a clean lint-free rag, then fill halfway with fresh new brake fluid. This prevents old contaminated fluid from circulating back into pipelines during bleeding.
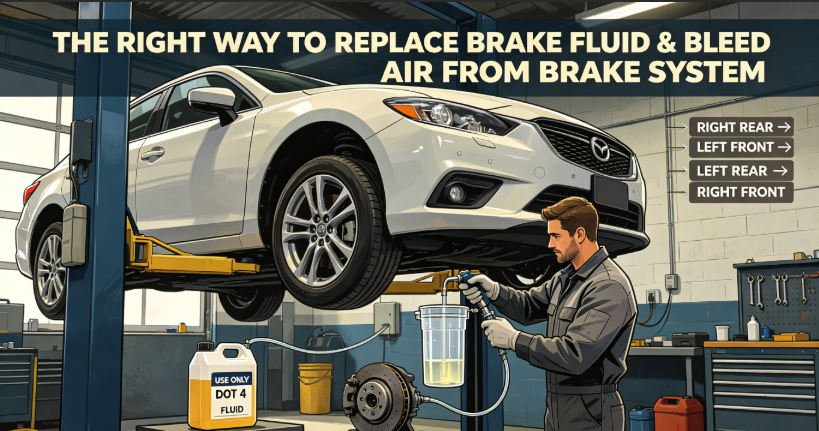
Step 2: Bleed Air In Correct Wheel Sequence
Follow the factory-recommended diagonal bleeding order to push old fluid and air toward the drain points efficiently:
- Right rear wheel (farthest from master cylinder)
- Left front wheel
- Left rear wheel
- Right front wheel (closest to master cylinder)
This sequence avoids recirculating drained old fluid back into newly flushed brake lines.
Step 3: Single Wheel Bleeding Operation
- Attach one end of the transparent drain hose to the caliper bleeder screw, submerge the other hose tip inside the collection bottle filled with a small amount of fresh brake fluid (to stop air from being sucked back into the line);
- Have a second person sit in the driver’s seat to slowly press and hold the brake pedal firmly to the floor;
- Loosen the bleeder screw 1 full turn—dark old fluid mixed with air bubbles will flow out through the hose;
- Tighten the bleeder screw fully before the assistant releases the brake pedal; repeat this pedal press/bleed cycle repeatedly until clear, bubble-free new fluid flows steadily from the hose;
- Torque the bleeder screw to the vehicle manufacturer’s specified value to avoid thread damage or fluid leakage.
- Top up fresh brake fluid in the reservoir frequently during the whole process—never let the liquid level drop below the MIN mark, otherwise new air will be drawn into the master cylinder.
Step 4: Repeat For All Four Wheels
Complete the identical bleeding process for each wheel in the fixed diagonal order, continuously replenishing new brake fluid in the reservoir to maintain safe liquid levels.
Step 5: Final System Inspection
- After all four wheels finish bleeding, fill the brake reservoir to the MAX marked line and fasten the cap tightly;
- Pump the brake pedal repeatedly 10–15 times to build full hydraulic pressure; test pedal firmness—no soft spongy feel should remain;
- Lower the vehicle to the ground and perform low-speed test braking to verify stable, responsive stopping power;
- Check all bleeder screws, hoses and cylinder joints for fluid leakage; wipe all spilled brake fluid off paintwork immediately.
3. Common Critical Mistakes To Avoid During Replacement & Bleeding
- Mixing different brake fluid types: Glycol DOT3/DOT4/DOT5.1 can only temporarily top-up each other; silicone DOT5 fluid must never mix with glycol fluid, as sediment and seal swelling will occur;
- Letting the reservoir run dry: Exposing the master cylinder inlet to air introduces large air pockets requiring full re-bleeding of the entire system;
- Releasing the brake pedal before tightening the bleeder screw: Creates negative pressure that sucks air back into brake lines;
- Reusing drained old fluid: Contaminated, moisture-laden drained fluid cannot be poured back into the system;
- Leaving the new brake fluid can uncapped during work: Rapid moisture absorption ruins fresh fluid before use;
- Over-tightening bleeder screws: Thread stripping causes permanent caliper fluid leaks requiring expensive replacement parts.
4. Professional Repair Shop vs DIY Operation Notes
DIY Owner Reminders
If performing brake fluid replacement yourself, strictly follow the diagonal bleeding sequence and always have a second person assist with brake pedal operation. For vehicles equipped with ABS modules, standard four-wheel bleeding is insufficient—ABS systems require specialized scan tool cycling to bleed trapped air inside valve assemblies, best completed by certified technicians.
Repair Shop Standard Best Practice
Professional garages use pressure brake bleed machines that push fresh new fluid from the master cylinder toward calipers, fully displacing all old fluid without introducing air, delivering more thorough results than manual two-person bleeding for passenger cars, light trucks and commercial vehicles.
Final Safety Tip
Brake fluid is corrosive to human skin, eyes and automotive paint. Wear protective gloves during all operations; if fluid contacts eyes, rinse continuously with clean running water for 10 minutes and seek medical attention immediately. Dispose of waste old brake fluid via authorized hazardous fluid recycling centers, never pour waste fluid down drains or onto soil.
Closing Summary
Complete brake fluid replacement is far more than simple fluid topping-up—systematic air bleeding is mandatory to eliminate residual moisture and air bubbles that compromise braking safety. Follow this standardized diagonal flushing workflow and avoid the listed frequent operation errors to maintain stable, reliable brake performance between maintenance intervals. Always select certified, standard-grade brake fluid from qualified manufacturers for every fluid change.
Welcome to contact GAFLE for more information & cooperation!
peter
ZHEJIANG GAFLE AUTO CHEMICL CO.,LTD
Tel:86-579-8222 1665
Fax:86-579-8246 4690
Cel/Wechart:86-13335993986
E-mail:peter@gafle.net
Web:www.gafle.net
peter
ZHEJIANG GAFLE AUTO CHEMICL CO.,LTD
Tel:86-579-8222 1665
Fax:86-579-8246 4690
Cel/Wechart:86-13335993986
E-mail:peter@gafle.net
Web:www.gafle.net